Showing posts with label arts. Show all posts

Friday, January 31, 2014

Flatten them, squish'em, squash'em into jelly.....


      Some of you might remember this post (here) where I made my own bats to throw on.  I was pretty happy with them for a while, but I started to notice some things about them that bothered me.  One big one was that the bat pins (the little nubs that hold the bat in place) stuck up about an eighth of an inch.  I know that doesn’t seem like much but when your hands are pressed down on a spinning bat it gets pretty irritating, it also stop you from cutting off larger objects like plates, bowls, and platters smoothly.  I thought I could deal with it; I have a few other bats that I could throw those types of things on so I kept using them.  The second thing that bothered me was that they are made of masonite, which is basically like compressed cardboard.  So when they get wet they tend to swell a little, and then when they dry they warp a little.  I was okay with this, again for a while but when you’re ready to throw and flipping through your bats and cannot find a flat one it gets pretty annoying.  This happened to me the other day, so I thought I would try to flatten all of my masonite bats at once, prompt like.  I soaked them in water to get them nice and pliable, and then stacked a couple of five gallon buckets full of water on top of them to get them nice and compressed, and left them for a day or two to dry.  


The all important close-up.


So now I’m thinking that my problems are solved (well one of them) and my bats will be flat and ready to use when I want.  I take my seat at the wheel and reach for a bat, and the first one I pick up is warped far worse than any I have yet seen.  Luckily it’s just that one, and the next one is pretty flat.  

Now it’s been a few more days and my bats are starting to warp again.  I’m thinking it’s time to invest in some of the higher end plastic bats that never warp, just to save myself the grief that I inflicted upon myself when I decided to make my own bats.


Maybe next time I will use a treated/sealed, and thicker plywood….

Wednesday, January 22, 2014

A Table to Work On


Let’s play a little catch up, I made this table a month or two ago. 
                After looking at my studio I decided I needed more table space dedicated to pottery.  The other table I have is used for everything else so it gets bits of dirt and sawdust all over it, not that good for pottery.  So I set out to build a large table.  I decided to stick with the dimensions of a standard piece of plywood (3/4 inch in this case), which is 8 foot by 4 foot, and I went with 3 feet tall.  I also wanted a lower level that I could use to store clay off of the floor.  I used 4 by 4 treated posts for the legs so that if they ever got wet it wouldn’t matter that much.  I built the frame out of two by fours; both the top and the lower shelf have supports running the four foot length to give it a little more support.  Once it was all assembled I covered the top of it with canvas to give me a nice work area.  It took me the better part of a Saturday afternoon but I was able to get it finished, and now it’s in full use and working out quite nicely.


Tuesday, January 21, 2014

Once more in to the Studio


I’m finally back in the studio after almost two years (seems like a lot longer).  I’m trying to get into a schedule that works with Ewan, which means I can only fit in about an hour to an hour and a half during the week, and a little more on the weekends.  I tend to go out to the studio when he goes in for his bath, after that its bed time for him so I can stay out as long as I want, but I have to get up at 3:30am to get ready for work so I’m usually in bed by 8:30pm.  It’s not much time but it’s enough to get back in the rhythm of the studio.  Well I need to get back to wedging some clay and getting ready to throw.  Thanks for visiting.


Tuesday, June 25, 2013

An update and an inquiry.


Ewan has become an outside baby since the last time I posted here.  So here is the obligatory baby picture.


And now for something completely different...  I’m thinking of starting a Kickstarter to buy a kiln, and I just wanted to run a few things past my “vast” audience.  I’ve been trying to think of gifts/incentives to give out for various levels of giving.  So far I have:

5- Hand written thank you card.

10-spoon rest/tea bag holder

20- Japanese style tea bowl (chawan).

40- Two Japanese tea bowls (chawans)

50- Four large(ish) matching tumblers or tea bowls

100-four Japanese style tea bowls (chawans), honey/sugar container, and creamer container.

150-3 hour lesson where I come to you to teach hand building or throwing, or you can come to the studio.  Lessons can be for any age.

If you have any ideas for other or better incentives please let me know, I’m completely open to suggestions.  I seem to be moving fairly slowly on this front, but I would like to have a kiln set up within the year.  I think the goal for this project would be around 7,000.  I’m looking at this kiln, the Olympic DD14 Down Draft.  It’s the largest kiln I can get without needing to use a forklift.  It will cost around 7,000 after I add the shelving kit and get a larger gas meter.  Thanks for reading.


Monday, July 9, 2012

Garden Expansion

 
This blog is all about the new expansion to our garden.  I have been thinking about expanding our garden for a while, and I’m just getting around to it.  When we made the raised bed garden that we are currently using, I thought that it was pretty big (at least if felt pretty big as I was hauling all of the compost one wheelbarrow full at a time…), but the more experience I get with our garden the more I realize that I would like to have a bigger garden.  So we can grow more of our own foods, and we can experiment with different types and varieties of vegetables.  I would like to grow at least two new types of vegetables per season to see how they grow and if we like them or not, and the new garden space will give me the room to do that, as well as the space to grow the staples that we love. 
To start I had to figure out where a good place to put the garden would be.  When we did the raised beds we got lucky, we didn’t see where the shade was during the day, and we only had one place to put it, which was on top of a bunch of grave someone had used to fill in a storm shelter.   It worked out pretty good because it gets plenty of sun during the day, and allows the soil to drain really well.  This time I had some knowledge of where the shade is during the day, since this time I could put the garden anywhere in the backyard that I wanted, I needed to know this.  I decided to put the new garden just south of where our raised beds are.  This gives them the most sun during the day and a wind break because there is a fence just to the west of the new bed. 


 Here is where I plan to put the new garden, next problem is how to get rid of the grass.  Last time I put a garden in the yard like this, I just tilled the ground and raked up most of the grass.  This seemed to work for a while, but after about a month it was completely over grown again, and now you cannot even tell where we had that garden (it was also right under a tree that shaded the whole bed all day).  This time I plan to kill the grass first, then till and rake all the roots out.  To kill the grass I laid out a 4 mill sheet of clear plastic and placed bricks around the edge and a few in the middle to keep it from blowing away.  The sheet of plastic is 10 feet wide by 25 feet long, which gives us a new garden bed that is 250 square feet; I believe this more than doubles our current garden size (I’m very excited about that).


This is as far as I have gotten so far, the plastic has been down for about 5 days and the grass under it has turned brown.  I’m not sure how long I will leave it down, but in the mean time I need to plan what I want to grow this fall and spring and map out where in the garden all of these plants will go.  I also plant to grow our tomato plants a little differently this coming year, I’m going to try something called espalier, which is the idea of training a plant to grow in/on a flat plane.  It should at least be interesting to look at.


Here is a list of the seeds that I recently purchased, they are all heirloom varieties, and hopefully will be tasty.  Please let me know if you have any suggestions of what else we should try to grow, I will gladly try to grow anything!


Bean (Pole): Blue Lake Green Bean  
Bean: Romano Pole Bean  
Broccoli: De Cicco  
Brussel Sprouts
Carrot: Scarlet Nantes  
Cauliflower: Snowball  
Chia  
Cilantro
Common German Chamomile  
Corn: Golden Bantam Yellow Sweet Corn  
Cucumber: Boston Pickling  
Cumin  
Dill Dukat  
Echinacea Purpurea
English Marigold  
Hyssop  
Kale: Dwarf Blue Curled Scotch Kale
Lettuce: Parris Island Cos Romaine
Lettuce: Rouge de Hiver Romaine Lettuce  
Okra: Emerald  
Oregano  
Parsley: Single (Broad) Leaf  
Pea: Early Alaska Pea  
Pepper: Cayenne Long Red Thin Hot Pepper  
Pepper: Jalapeno Pepper  
Spinach: Bloomsdale Long Standing Spinach  
Spinach: New Zealand Spinach  
Squash: Prolific Straightneck Summer Squash  
Thyme: Common Thyme  
Tomato: Cherokee Purple  
Tomato: Large Red Cherry  
Tomato: Roma  
Vera Lavender  
Watermelon: Sugar Baby  
Wild Bergamot  
Yarrow - White 
Zucchini: Black Beauty Summer Squash
Zucchini: Round Zucchini Summer Squash

Wednesday, July 4, 2012

A Horse with no Mane

Keturah convinced me to throw some pots so we could do a horse hair firing.  So I threw a few 1 and 2 pound forms, it ended up being about 50 or so pots, 25 of each weight. 

Here are a few of the 2 pounders.
 

After I trimmed them I allowed them to get bone dry, and then rubbed them down with some steel wool to smooth out the rough edges.  I then rubbed them down one at a time with vegetable oil, and then burnished them with the back end of a spoon.  Here are a couple of pictures of the burnishing one static and one action shot.


Here’s a group shot of the first batch freshly burnished, you can see our kitchen light reflecting off of the surface of the pots.
 

Here’s a close up of one of the vases.


I then loaded the kiln to the brim with the pots, and fired the kiln up to around cone 010 (1657 f, 902 c), and then let it cool down to about 1100 f.  We then set up a station on the other kiln with a lazy susan, some kiln shelves, and a piece of fire blanket.  After the kiln reached 1100 f we began to take the pots out one by one and lay the horse hair on them, and allowed the hair burn and sizzle on the surface.

  
Here are a few photos of the hair being burned on the surface of the pots.

  
A group shot soon after we finished the last one.

  
A group shot of the pots after we washed them off.


After the pots dried we took some wax and polished the burnished surface to bring back some of the shine lost during the firing.  It ended up being about 23 pots that we finished this time around.
Here are a few shots of individual pots, look for these on our Etsy site in a couple of weeks.


Monday, June 4, 2012

Compost II

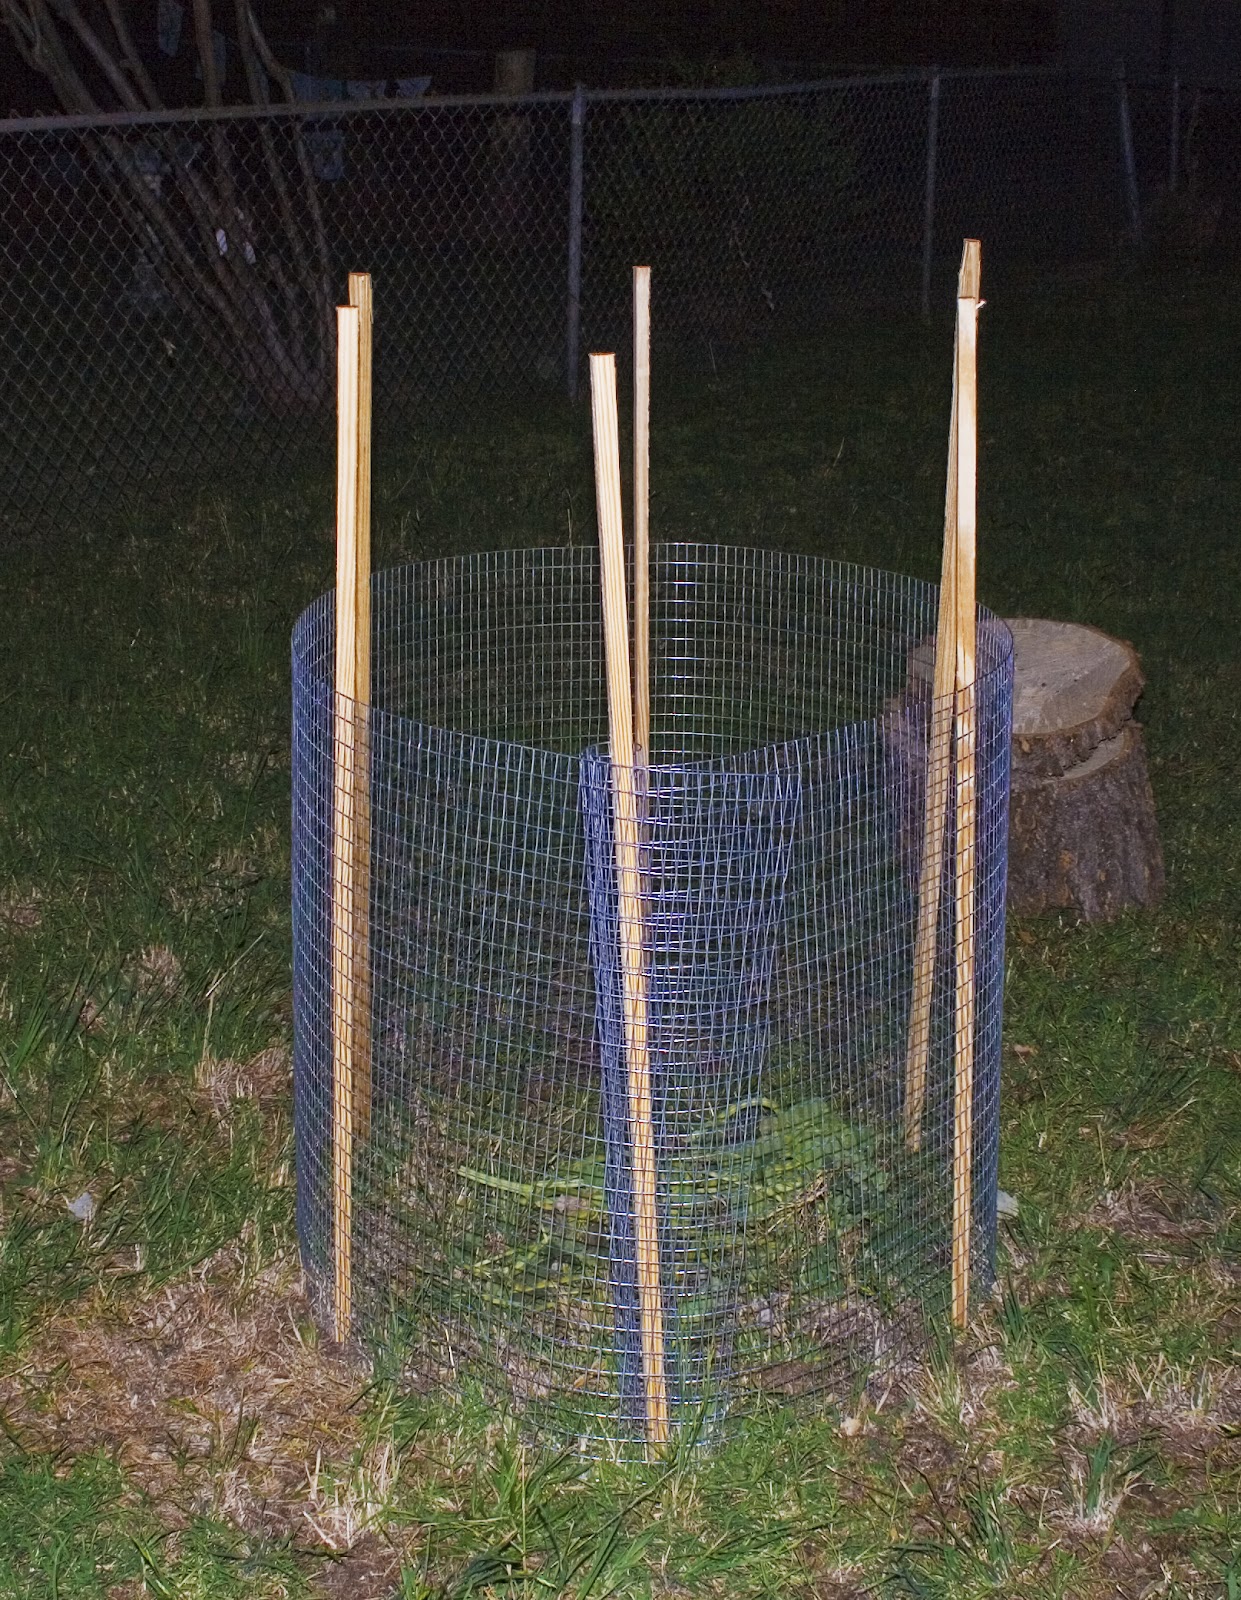
We threw this compost container together the other night (which is why the pictures are so dark). We took this idea from our friend Andy, because our other composter wasn't big enough for all of our compost and this was really easy to put up.


What we did was hammer in about 6 stakes in a roughly circular shape.


And then wrapped some chicken wire around it to keep all the compost together.  Later we'll go back and cut the tops off of the stakes and start to fill it with compost.  We also put some hay down in our garden, mostly over the soaker hose, in hopes that it will help keep the plants moist and cool during the summer heat.

Tuesday, May 22, 2012

What’s Better than a Good Soak…

I knew I had today off from work I had a long list of jobs I wanted to get finished and/or started today.  What I wasn’t expecting was to not be able to sleep last night; I ended up going to bed around 3:30am.  I’m not sure why I couldn’t sleep, but I was able to research a few things that I was thinking about doing later this year, so it wasn’t a complete waste of a non-sleeping night.  When I woke up this morning at about 7am, I thought I would get an early start on the day but after I ate breakfast I was right back to sleep until 10am.  When I woke up this time I was really groggy, and very dazed.  At the time I didn’t think I would get anything done, but after a sleepy talk with my wife at her work (over the phone of course), and some homemade guacamole I felt suddenly energized.  So I headed out to the garden to have a look around, and saw a length of soaker hose my mother-in-law had given us.  I figured it had been sitting there long enough (about 3 months), and it was time I put it to use. 
I cut a length of garden hose long enough to go from our rain barrels to the garden, attached it to the rain barrels and the other end to the soaker hose.


I then began to twist and loop the soaker hose around half of our garden.  It wasn’t long enough to reach the cucumber, squash, zucchini, a tomato, and the eggplant; I will be watering those by hand for a while until we get more hose, or maybe a drip system.
 

Here you can see the soaker hose just beginning to get soaked…  That’s one of our Thai hot peppers!!


Here it loops around two of our tomato plants, with some tomatoes on them!!


Here it twists around a tomato, some tomatillos, and two different beans.  There is also a mystery plant in there, we’re not sure what it is but we think it might be a pumpkin.  How it got in the middle of our garden we haven’t the slightest…


These are our cucumbers, they are a little spikey at the moment, but hopefully they will be tasty…


Our first zucchini, these guys are starting out a little slow…


 Our yellow squash on the other had is exploding with fruits.  We already picked a few the other day and already there are a bunch more almost ready to eat!!


We let some of our leeks from last fall go to seed, and the flowers they have are a lot like the onions but these have a slightly purple tint to them.


I set up this little trellis the other day for our watermelon to grow up onto.  We didn’t have any luck last year with watermelon, so hopefully these guys will survive and produce some melons!!


Here are our volunteer veggies (they grew up out of our compost pile we had last year), there are a bunch of cucumbers (with fruits on them already!), and a couple of tomato plants with flowers on them.


Here is another shot of our complete garden; we think it’s looking pretty good so far!


  I picked up this log from the side of the road the other day after driving past it a few times.  Stay tuned I’m going to try and make a couple of things out of it…